Portable Headphone OpAmp Amplifier Kit?
Tinkering
I have long been a tinkerer with electronics so when i was recently banned from driving, got bought an Archos GMINI 202XS, a pair of Etymotic ER6i Headphones (to be refered to as cannes from this point fourth!) and realised the gmini didnt have the berries to drive the cannes i decided to build a headphone amp.
History
Historically, portable headphone amplifiers have been built with an array of transistors (normally 3) and run on 3 to 9 volts with a relatively high current draw. I didnt want to spending 4 quid (Pounds!) a week on fecking 9V duracell batteries so i opted for an opamp design. Opamp's are small IC's (chips) that use feedback loop to control their functions. The advantage being the dont draw as much current as an array of transistors EG; my current amp draws between 10 and 15mw at full chat, my transistor amp draws 50mw at full chat! Another historical fact is that when i used to drive i would A L W A Y S have music playing so why should it be any different now i have to walk and use public transport (hhhrrrggg) ??
Can a few resistors/capacitors and a chip make that much difference?
Oh yes indeed. Even to an absolutely crap personal stereo in fact! I know a chap who seems to think a £5.99 MP3 player is the same as a £599 MP3 player (or is he just a tight arse, skinflint, yid?). The use of this amp on his MP3 player increased the qulity of the sound 2 fold and volume by about the same too! The opamp simply increases the voltage. It does however, have its disadvantages. The opamp does not know the difference between noise and music so in laymans terms, if you have a noisey source, you will have a noisey amp! Only one of the amps i have built (about 8 in different formats now) has suffered from noise and that was cured by adding a single resistor to the feedback loop. The simplest way to check for noise is to connect the amp up but leave the source turned off, in a quiet environment of course.
Build Time
The first time i tried to build one of these i used this tutorial at tangentsoft and cross referenced it with this (404) one at headwize (404). Neither really helped much because i couldnt get the required RadioShack protoboard which meant pissing about cutting the strip board i was using with a stanley, not fun. Thats what turned me to the direct connection method, why mess about with boards when you can just solder the components together?!?
Board Method (See above links for info!)
If you choose the board method you really are doubling the time it takes to build. It took me an hour to cut, clean and score the board such that it was usable. You also get the inevitable slips with the blade so you end up with a / instead of a |! You are looking at an evening to prepare the board and add the jumpers. Another evening to build the power section. Basicly this uses 2 resistors and 2 capacitors. The resistors reduce voltage and create a virtual ground, the caps smooth out the power! Then another evening to add the amplifier components and test it all! There is really only one way to test it and thats by connecting it up and running it. So all in all, it takes about 6 to 10 hours to build and test it this way!
Direct Connection Method
With this method we still need the power circuit with 2 resistors and 2 caps, i assembled this on a tiny bit of board. Again, you can use the above links to get more info about assembling the power section. Assembling the amplfier section is next, i spent about an hour preparing the parts. An hour soldering them together, an hour testing and installing it in the tin. My version has 2 external connectors, one for input and one for output. If you only use the amp for a personal cd/mp3/cassette there really is no need for a volume control. I wanted the tin to be as clean as possible. An external power switch and volume control are surplus to requirements when the gadget is gonna be floating around in a bag getting knocked about. It will get turned off and it will get turned up and down. My first attempt at this version took about 4 hours to build!!! Which is nice...
The Result
The result is a very compact headphone opamp amplifier based loosely on the Chu Moy design that makes your personal audio gear sound better and louder. It even saves on batteries (in a false economy sort of way). I dont know how to test it with a meter (aside from power draw) but i do know when i connect a pair of cannes to it the sound M U C H better than direct connection to the mp3/cd/cassette.
Pictures
Wide View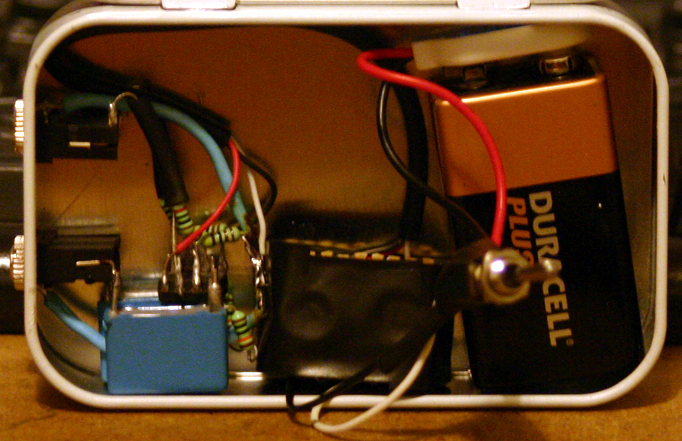 |
Close View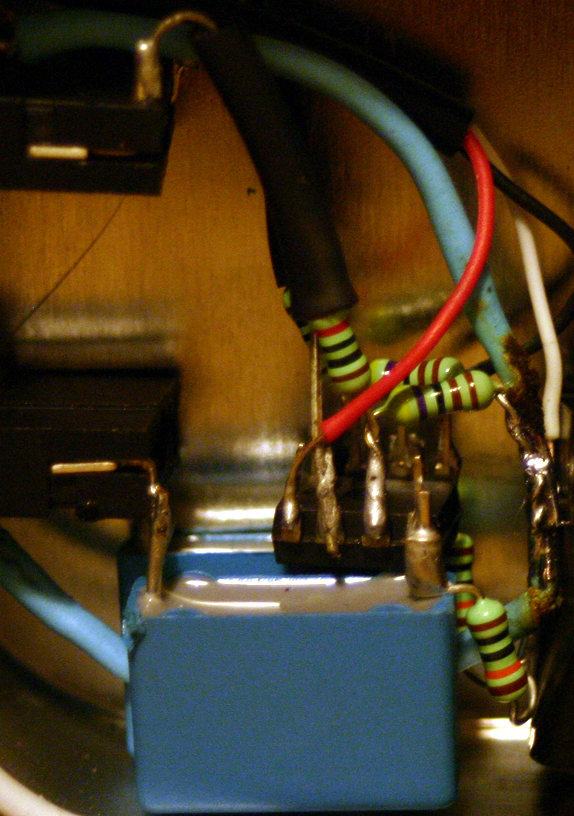 |
Comments
I tried to make one of these... Oh dear, what a disaster. I burnt my fingers time and again trying to hold the parts together whilst I soldered. And then fried a pair of headphones (only cheap ones) because I had it wired up wrong..
----