Tangle, Dangle, Strangle and Mangle:
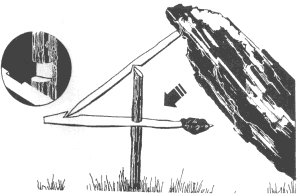
!-! Spring Snare !-!
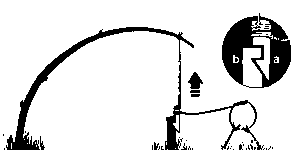
Game
running through the snare disengages the trigger bar,and the prey is flung off
the ground. Use on game trails or in gaps through rocks or hedges. Cut a notch
in triggerbar (a) to fit upright (b). Drive upright into ground. Attach snare to
trigger bar, then trigger bar to sapling.
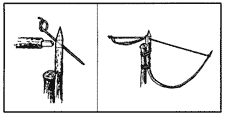
!-! Baited Snare !-!
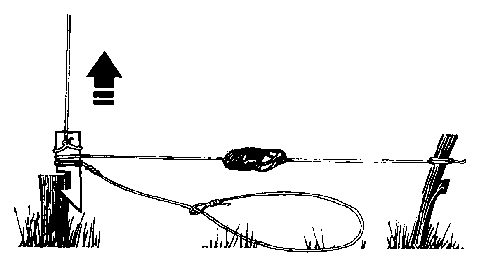
Construct as for spring snare but using the release mechanism shown. The bait
support should be only lightly driven into the ground as it must fly away with
the snare.
!-! Leg Snare !-!
Push a natural fork or two sticks tied together into the ground. The line from
a sapling is tied to a wooden toggle and the toggle passed under the fork. When
the game takes the bait, attatched to a seperate stick, it falls away releasing
the toggle which flies up taking the snare and the game with it. Large versions
are amongst the best snares for heavy game.
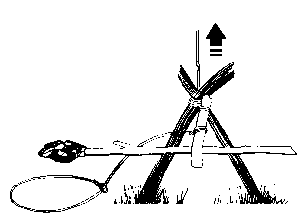
!-! Platform Trap !-!
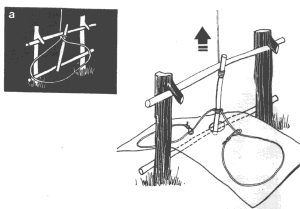
Site over a small depression on the game trail. Snares on the platforms either
side, when the platform is depressed the trigger is released and the game held
firmly by the leg. For smaller, lighter game use the mechanism shown in (a),
displacing either the bottom bar or the toggle will trigger the trap.
!-! Deadfall !-!
A simple and effective deadfall trap, can be made to any size. A horizontal bait
bar is is balanced at right angles to an upright with a lock bar, which supports
a rock or other heavy weight pivoting around the tip of the upright.
!-! Tripwire Deadfall !-!
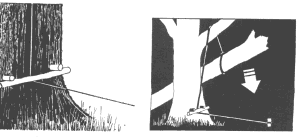
A heavy log is suspended over a busy game trail, trips the wire and pulls a
retaining bar from under two short pegs secured in a tree trunk. Keep the pegs
as short as possible so that the bar will disengage easily.
!-! Spear Deadfall !-!

Same as tripwire deadfall but utilising rocks to add weight and sharpened sticks
to add trauma to the crushing blow.
!-! Sprung Spear !-!

This is a VERY dangerous trap, it should always be constructed and approached
from behind the spring of the trap, only attempt if you are confident that your
cordage and other materials are strong enough. A springy shat with spear attached
is suspended over a trail. A slip ring made of SMOOTH material is attached to a
trip wire and acts as a release mechanism. A toggle (a) and short line to a fixed
upright hold the sprung shaft in tension. A further rod through the ring is
tensed between the nearside of the sprung shaft and the far face of the upright,
securing until tripped.
!-! Baited Hole Noose !-!
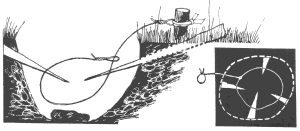
This trap is very useful for scavengers, drive 4 sharpened sticks into the pit,
through the edges. Lay a noose across them attached to a peg outside the pit.
!-! Drag Noose !-!
Use a drag noose on an animal run (Figure 8-6). Place forked sticks on either
side of the run and lay a sturdy crossmember across them. Tie the noose to the
crossmember and hang it at a height above the animal's head. (Nooses designed
to catch by the head should never be low enough for the prey to step into with
a foot.) As the noose tightens around the animal's neck, the animal pulls the
crossmember from the forked sticks and drags it along. The surrounding vegetation
quickly catches the crossmember and the animal becomes entangled.
!-! Squirrel Pole !-!
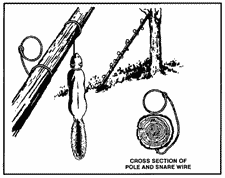
A squirrel pole is a long pole placed against a tree in an area showing a lot of
squirrel activity (Figure 8-8). Place several wire nooses along the top and sides
of the pole so that a squirrel trying to go up or down the pole will have to pass
through one or more of them. Position the nooses (5 to 6 centimeters in diameter)
about 2.5 centimeters off the pole. Place the top and bottom wire nooses 45 centimeters
from the top and bottom of the pole to prevent the squirrel from getting its feet
on a solid surface. If this happens, the squirrel will chew through the wire. Squirrels
are naturally curious. After an initial period of caution, they will try to go up
or down the pole and will get caught in a noose. The struggling animal will soon fall
from the pole and strangle. Other squirrels will soon follow and, in this way, you can
catch several squirrels. You can emplace multiple poles to increase the catch.
!-! Ojibwa Bird Pole !-!
An Ojibwa bird pole is a snare used by native Americans for centuries (Figure 8-9).
To be effective, place it in a relatively open area away from tall trees. For best
results, pick a spot near feeding areas, dusting areas, or watering holes. Cut a pole
1.8 to 2.1 meters long and trim away all limbs and foliage. Do not use resinous wood
such as pine. Sharpen the upper end to a point, then drill a small diameter hole 5 to
7.5 centimeters down from the top. Cut a small stick 10 to 15 centimeters long and
shape one end so that it will almost fit into the hole. This is the perch. Plant the
long pole in the ground with the pointed end up. Tie a small weight, about equal to
the weight of the targeted species, to a length of cordage. Pass the free end of the
cordage through the hole, and tie a slip noose that covers the perch. Tie a single
overhand knot in the cordage and place the perch against the hole. Allow the cordage
to slip through the hole until the overhand knot rests against the pole and the top
of the perch. The tension of the overhand knot against the pole and perch will hold
the perch in position. Spread the noose over the perch, ensuring it covers the perch
and drapes over on both sides. Most birds prefer to rest on something above ground and
will land on the perch. As soon as the bird lands, the perch will fall, releasing the
over-hand knot and allowing the weight to drop. The noose will tighten around the bird's
feet, capturing it. If the weight is too heavy, it will cut the bird's feet off, allowing
it to escape.
!-! Bottle Trap !-!
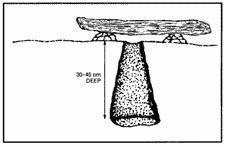
A bottle trap is a simple trap for mice and voles (Figure 8-16). Dig a hole 30 to 45
centimeters deep that is wider at the bottom than at the top. Make the top of the hole
as small as possible. Place a piece of bark or wood over the hole with small stones under
it to hold it up 2.5 to 5 centimeters off the ground. Mice or voles will hide under the
cover to escape danger and fall into the hole. They cannot climb out because of the wall's
backward slope. Use caution when checking this trap; it is an excellent hiding place for
snakes.
!-! Noosing Wand !-!

A noose stick or "noosing wand" is useful for capturing roosting birds or small mammals
(Figure 8-10). It requires a patient operator. This wand is more a weapon than a trap.
It consists of a pole (as long as you can effectively handle) with a slip noose of wire
or stiff cordage at the small end. To catch an animal, you slip the noose over the neck
of a roosting bird and pull it tight. You can also place it over a den hole and hide in
a nearby blind. When the animal emerges from the den, you jerk the pole to tighten the
noose and thus capture the animal. Carry a stout club to kill the prey.
Just a Reminder
These traps can kill, and yes, some can kill a HUMAN so, if you must practice:
- Dont take children.
- Dont practice in the cold or bad weather.
- Dont practive under the infulence of drugs or alcohol.
- BE VERY CAREFULL ! Especialy with the Sprung Spear. I have a scar to prove how dangerous that one is.